
I’ve been meaning to boost my environment painting skills for a while now, so I thought I’d surf around for some tutorials on the subject.
Continue reading “Small Canvas Digital Painting – Experiment 1”

The explorations of an artloader.
I’ve been meaning to boost my environment painting skills for a while now, so I thought I’d surf around for some tutorials on the subject.
Continue reading “Small Canvas Digital Painting – Experiment 1”

This is a steampunk helmet digital painting done in Gimp. It is the Standard Issue Suborean Guard Combat Helmet as worn by Sylen Benevolen and Atonis Trogade from my digital comic project.
I experimented again with a different art process which I will try to describe below.

I’ve been rolling ideas around inside my head and have settled upon a ruined steampunk factory as the site of the opening scene in my comic book project.
The next task in my comic book project is to do a concept picture of the ruined steampunk factory. My approach so far has been as follows:
One thing I’ve noticed is that for environments, the pro’s seem to use many more layers. This works pretty well when you’re going for an environment with mist and a distant background landscape.
After struggling to get a good brush stroke for the planetary rings in the painting above, I reckon I will model the rings in Blender and then combine with digital painting in Manga Studio.

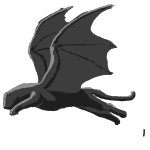
I’m done with my winged panther digital painting. The background was done using Manga Studio’s water colour brush set at a really big brush size. I also tried out the snap to grid feature when drawing in the gold border. The total time taken was 5 hours, less than half the time of my previous picture so I think I will stick with this new process.

I’ve given Iyeon the Winged Panther some more definition on his hind legs and also given him some armour. The membrane of his wings now also has a redish tinge to it which I thought would look more natural – not sure when I last saw a winged panther in the wild though …
I’ve been working on a winged panther digital painting. Again I’m skipping the line drawing stage and going straight to painting. Time spent is at around 3 hours so far in Manga Studio.
Here he is, Iyeon the Winged Panther:


After taking 13 hours over my previous picture I thought I’d try out a faster technique. This time I’ve missed out the line drawing stage and gone straight to digital painting. I used a reference photo, Manga Studio and the Wacom Intuos3. This black panther digital painting took 2 hours. Next I will paint one with bat-wings and some armour!

After the blocking in of colour I’ve started adding in the shadows for my full body ecomic concept art picture of Benevolen.
This picture has taken me 11 hours so far and has made me realise that my process is very inefficient. I spent a lot of time adding details to the line drawing which is getting painted over anyway.
I think what I should do in future is just do a very quick line drawing and not add the difficult detail till I’m painting in the colours.

For this concept I’ve changed my technique slightly. In Manga Studio, instead of having the line layer on top and the paint layer beneath, I’ve switched it so that the paint layer is on top. This means that instead of having the line layer always visible it will now disappear as I paint over the top of it. I feel that this approach will allow me closer control on areas of detail as I paint whereas before, the line-work was obscuring the paint-work.
Total time spent on this is now at 10 hours and I have just completed “Blocking In” colour:

More eComic Concept Art. I’m doing a full length concept of Sylen Benevolen now but I’m having a real battle with his legs. I’ve redrawn them about 4 times, hence the time spent is now at 3 hours for this.
